FROM SPREADSHEET TO SEAT MAP
Turn an Excel seat list into a seating chart
Start with your sections, rows and seat numbers. Check the list, mark reserved or accessible seats, and make a printable plan for your team.
Free in this early preview · No account · Spreadsheet files stay on your device
From a seat list to a plan you can use
01 · YOUR SPREADSHEET
One row per seat
| Section | Row | Seat |
|---|---|---|
| Left wing | A | 01 |
| Left wing | A | 02 |
| Left wing | A | 03 |
| Left wing | A | 04 |
| Left wing | A | 05 |
| Center | A | 01 |
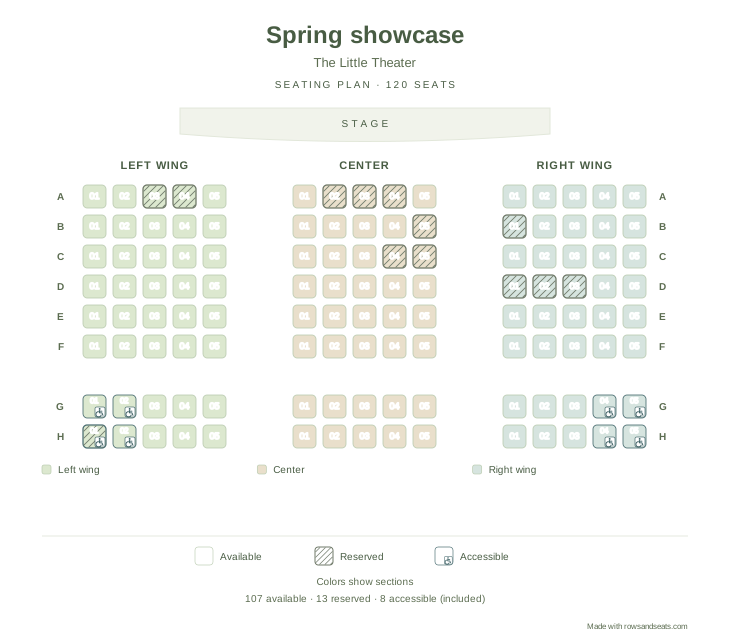
6 of 120 entries shown. The example file also includes grid positions, reservation status and accessibility markers.
Download the same example as CSV02 · YOUR GENERATED CHART
What your spreadsheet needs
Use one row per seat. Three columns are required; the rest are optional. If your headings are different, you can match each field to a column when you import.
| Column | Required | What goes in it |
|---|---|---|
| Section | Yes | The block of seats, such as Left wing or Balcony. For a single section, use Main on every row. |
| Row | Yes | The row label your ushers use, such as A or 12. |
| Seat | Yes | The seat number or label. Leading zeros such as 01 are kept. |
| Grid row, Grid column | No | Provide both columns to keep positions. For an aisle, skip a coordinate: columns 1, 2 and 4 leave column 3 empty. Every seat still needs both values. |
| Status | No | available or reserved. Sold, booked, held and taken are read as reserved. |
| Accessible | No | yes or no to mark an accessible seat. An accessible seat can also be reserved. Confirm arrangements with your venue. |
Keep one worksheet named Seats in an .xlsx file, or save as CSV UTF-8. The downloadable example has the expected headings and worksheet name.
If you omit both grid columns, the planner generates a simple layout: sections run left to right with a gap between them, and shorter rows are centered. This does not reconstruct your venue, curved rows or odd/even seating. Review the chart against the room; use grid coordinates for exact positions.
Import, review, print
- Open the planner and choose Upload a spreadsheet. Select an .xlsx or UTF-8 .csv file. Review column matches and any errors before choosing Use this seating plan. Cancel to keep your current plan.
- Check the chart. Select seats to mark them reserved or accessible, set the event title and venue, and choose whether to show the stage and seat numbers.
- Print or export. Save a PDF from the print dialog, download a PNG or SVG, or export the updated spreadsheet for the next change.
What you get
- A one-page overview with section colors, row labels on both sides and a legend for reserved and accessible seats.
- Enlarged section pages for plans with up to 12 sections. Dense sections may be split across pages; check the preview and any small-text warning before printing.
- A4, A3, US Letter and Tabloid (11 × 17 in) paper sizes, plus PNG and SVG for slides, signs and print shops.
- An Excel or CSV export with your updated statuses, so the spreadsheet stays the source for the next event.
Keep the spreadsheet. Generate the drawing.
If you maintain a list of fixed seats, you can use that list to generate the chart instead of also drawing it with spreadsheet borders. RowsAndSeats checks duplicate seat references and overlapping grid positions before you confirm an import. You still review the layout, aisles and markers against the real room.
Use the event planner for auditoriums, theaters, churches and ceremonies where people look for a row and seat number. Edit the positions in Excel, import the file, update seat markers and export a fresh spreadsheet for the next revision.
Frequently asked questions
Can I use a Google Sheets file?
Yes. In Google Sheets choose File, Download, then Microsoft Excel (.xlsx) or Comma-separated values (.csv), and upload that file. For an Excel workbook, name the worksheet Seats so the planner knows which sheet to read.
What if my column headings are different?
The import review suggests matches for common headings and lets you choose the column for each field yourself. Choose which extra columns to Ignore during the review; ignored data is not kept in the plan or its exports. Up to 64 columns can be read from one file.
How many seats can I import?
Up to 1,000 seats in a file of up to 2 MB, on a grid of up to 100 rows by 100 columns. For a larger venue, make one plan per level or area.
Is my spreadsheet uploaded anywhere?
No. The file is read in your browser and the plan is saved in this browser's storage. There is no account, and the spreadsheet is not sent to a server.
Does it work for wedding tables or names at each seat?
The event planner is for fixed rows of numbered seats, including ceremony seating with row and seat references. It does not arrange round reception tables or assign guest names. For student names and classroom seating, use the separate classroom planner.
Is it free?
Yes. Importing, editing, printing and every export are free in this early preview. Image and printed exports carry a small rowsandseats.com credit. No payment details are required.
Try your seat list
Open the planner, choose Upload a spreadsheet, and check the import review before replacing your current plan.