EXAMPLE SEATING LAYOUT
Graduation ceremony seating chart
Use this 350-seat example to separate faculty, graduates and families, then adapt the spreadsheet to the room and the ceremony’s entry order.
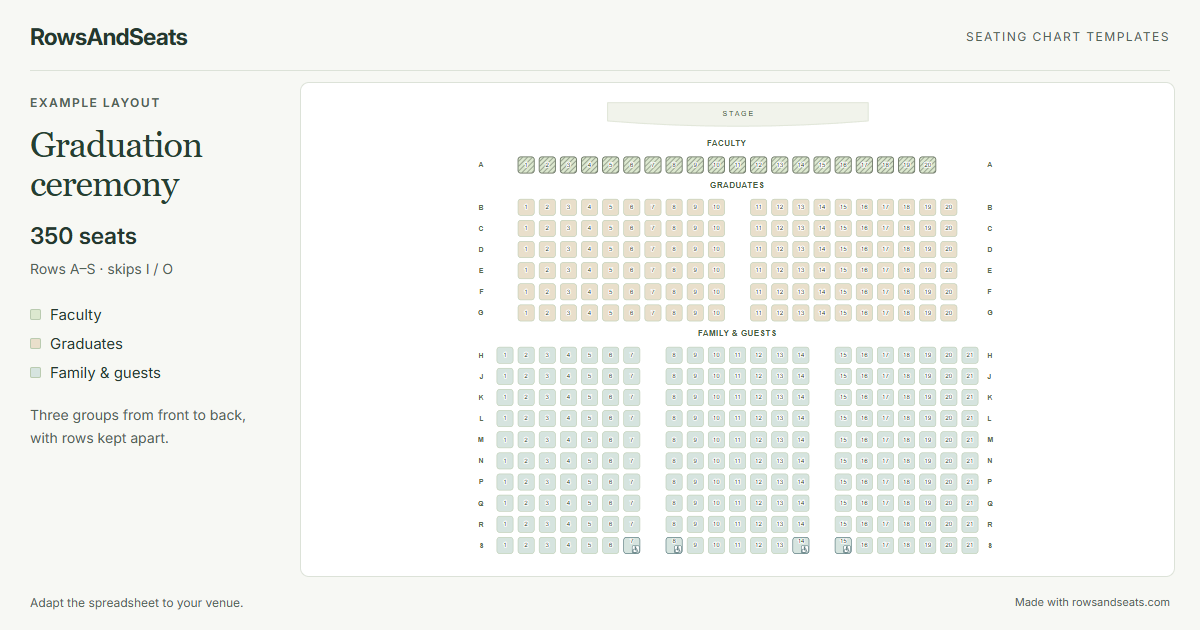
What's in this template
- Faculty contains 20 seats in row A, all marked Reserved. A blank grid row separates this front section from the graduates.
- Graduates contains 120 seats across rows B through G: six rows of 20 seats, split into two blocks of 10 with an aisle gap.
- Family & guests contains 210 seats across ten rows, H through S, skipping I and O. Each row has three blocks of 7 seats. Another blank grid row separates families from graduates.
- Four Accessible markers appear in Family & guests row S, at seats 7, 8, 14 and 15 beside the two aisle gaps. They are included in the 350-seat total.
How to adapt it to your venue
- Download Excel or CSV and compare the three sections with your venue plan. Confirm how many actual seats belong to faculty, graduates and families before changing the example.
- Edit the spreadsheet entries to match those counts. Use Grid row and Grid column for physical positions, including gaps between sections and blocks; use Row and Seat for the labels people will follow.
- Check the faculty reservation and accessibility markers. Update the Status and Accessible columns, or change those markers by selecting seats after import. Keep any graduate-name list in a separate document.
- Import the file, inspect the preview and confirm it. Add the ceremony title and venue line, then compare the stage direction and seat numbering with the entrance and procession plan.
- Export a visual chart as PNG or SVG, or use Print / PDF for staff copies. Save Excel or CSV for later edits and reimport the final file when you need to revise the arrangement.
Check the procession before fixing the seating order
Work through the entry sequence with the ceremony coordinator. Decide which graduate rows fill first and which end of each row people enter from. Number the spreadsheet seats accordingly, then keep a separate roster that uses those same references. A chart can show the intended positions, while a rehearsal checks whether the sequence works in the room.
Review the faculty row as its own allocation. Confirm who needs to be seated there, whether they enter with the procession and which route they will use to reach the stage. The example reserves all twenty front seats; adjust that marker and the seat entries to reflect your own ceremony.
Give family ushers a clear section reference and check the rear aisle positions on site. Confirm accessible spaces and companion arrangements with the venue team before distributing the plan. If the actual room needs a different arrangement, update the spreadsheet coordinates and reimport it before making the final print copies.
Frequently asked questions
Can I put graduates in the order they will enter?
You can arrange the seat positions and numbering in the spreadsheet to match your entry plan. Keep the graduate roster separately and match names to those references yourself; the event planner does not automatically assign graduates to seats.
Does the reserved faculty row confirm anyone’s attendance?
No. Reserved is a visual seat status that you control. It does not record invitations, responses or bookings. Confirm attendance separately and update the reserved seats when the ceremony allocation changes.
Why are there blank grid rows between the groups?
They create visible separation between Faculty, Graduates and Family & guests. Grid row controls placement, while Row supplies the printed row label. Check the real spacing with your venue and edit the coordinates to match its arrangement.
Can families use a different block arrangement?
Yes. Edit the Family & guests entries and their Grid column values in Excel or CSV, preserving the aisle gaps your venue needs, then import the file again. The planner renders those positions; it does not redesign the blocks automatically.